Table of Contents
Bmp writer
The module written in C, primarily for embedded usage. Bmp-writer helps you to create bmp screenshots from your device to put them into the user's manual booklet.
Introduction
During development of various devices with MCU (i.e. embedded systems), I faced the same typical problem many times: when it's time to write user's manual, we need to take screenshots from device's screen.
That is, decent user's manual should have nice pictures of what user is expected to see on the screen.
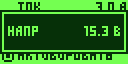
For example, there are few pictures from the charger's display:


In order to make my life easier, I've written universal program module that generates bmp picture, and actual image data is taken from user-provided callback function (which should return color of the particular pixel on the screen)
If you're an embedder, you know that embedded systems often have very insufficient resources: say, 128KB of flash memory and 8KB of RAM, or even less. So, the distinctive feature of this module an extremely low memory consumption.
How this is accomplished: data is generated by small parts (4 bytes is the maximum size) and is returned to user by just 1 byte. Such an algorithm works somewhat slower, but for such a development task, speed is not important at all. On the other hand, this approach has notable advantages:
- It gives you ultimate flexibility of what you're going to do with the data;
- It takes fixed and small amount of memory, independently of the size of image being generated.
So, for the generation of image of any size and color depth, only 46 bytes should be allocated (and plus about 20 bytes of stack). How these 46 bytes should be allocated (from heap, stack or statically) is an option.
My devices usually just transmit generated bmp data via debug UART to the host machine. You might want do the same, or probably write to flash, or whatever: it's up to you.
Code size: about 2 KB with the -Os.
Supported modes: 1, 4, 8, 16, 24, 32 bits per pixel.
In 16-bpp mode, there are two ways possible: 5-5-5 (which actually takes 15 bits) и 5-6-5 (an “extra” bit is given to green)
32-bit mode is effectively the same as 24-bit, apart from the fact that an extra zero byte will be added for each pixel. So, image size grows up uselessly.
Now I'm going to show you user code that generates fictional screenshot, and after this I'll tell you some of the details.
So, here we generate 24-bit image 256 * 50 pixels with gradient from green to blue:
- main.c
#include "bmp_writer/bmp_writer.h"

/**
 * User's callback function which returns color of particular pixel on the
 * screen.
 *
 * Since it is fictional screenshot, this function just generates a gradient.
 */
static T_BmpWr_Color32 _bmp_pix_color_get_32(
      uintptr_t user_data,
      T_BmpWr_Coord x,
      T_BmpWr_Coord y
      )
{
   return BMP_WR__COL_RGB_32bit(0x00, 0xff - x, x);
}


int main(void)
{

   //-- Create struct with params for bmp generator
   T_BmpWriter_CtorParams writer_ctor_params = {

      //-- Main image params: color depth, size
      .color_depth = BMP_WR_COL_DEPTH__24,
      .width       = 256,
      .height      = 50,

      //-- User's callback functions
      .callback = {
         //-- for this mode, we need just one function that returns color for
         //   24- and 32-bit images
         .func = {
            .bpp_24_32 = {
               .p_pix_color_get = _bmp_pix_color_get_32,
            },
         },
      },
   };

   //-- Create T_BmpWriter object with appropriate params
   T_BmpWriter *p_bmp_writer = new_bmp_writer(&writer_ctor_params);

   //-- Now, byte by byte, retrieve all the data!

   while (bmp_writer__available_data_len__get(p_bmp_writer) > 0){
      char cur_char = bmp_writer__next_byte__get(p_bmp_writer);

      //-- Now, cur_char contains next byte of the bmp file data.
      //   We're free to do whatever we want with it: maybe fill some
      //   fixed-size buffer that will be written to flash when buffer is
      //   full, or transmit somewhere, or anything.
   }

   //-- Done; image is generated.
   //   Delete the object.
   delete_bmp_writer(p_bmp_writer);

   return 0;
}
As you see, user's code is really simple: just set up image params, get bytes, do something useful with them.
Usage
Depending on color depth, usage is a bit different.
There are three options:
1, 4, 8 bits per pixel
This is an “indexed colors” mode. That is, an image contains a palette. We need to do the following:
- Specify callback function returning 24-bit color from palette;
- Specify callback function returning a number of color in the particular pixel
16 bits per pixel
There's no palette, and, obviously, each pixel takes 2 bytes. We need to do the following:
- Specify which color mask to use: 5-6-5 (default) or 5-5-5;
- Specify callback function returning 16-bit color of the particular pixel.
24, 32 bits per pixel
This is the simplest way, the only thing we need to do is:
- Specify callback function returning 24-bit color of the particular pixel;
Generation of 1-bit picture
Mainly I work with devices which have monochrome display, so, this is the most frequently used configuration.
In the real project, you must have a function returning whether the particular pixel on. In this sample, we will create simple dummy function that will “draw” a diamond.
#define _IMG_WIDTH      256   //-- picture width
#define _IMG_HEIGHT     50    //-- picture height
#define _DIAMOND_DIAG   30    //-- size of a diamond side to draw


/**
 * Function that returns 1 if particular pixel on the display is on, and 0 otherwise.
 * In this example, we just "draw" a diamond in the middle.
 */
static char _is_pixel_on(T_BmpWr_Coord x, T_BmpWr_Coord y)
{
   char ret = 0;

   if (y > ((_IMG_HEIGHT / 2) - (_DIAMOND_DIAG / 2)) && y < ((_IMG_HEIGHT / 2) + (_DIAMOND_DIAG / 2))){
      T_BmpWr_Coord tmp;
      if (y < (_IMG_HEIGHT / 2)){
         tmp = y - ((_IMG_HEIGHT / 2) - (_DIAMOND_DIAG / 2));
      } else {
         tmp = ((_IMG_HEIGHT / 2) + (_DIAMOND_DIAG / 2)) - y;
      }

      if (x > ((_IMG_WIDTH / 2) - tmp) && x < ((_IMG_WIDTH / 2) + tmp)){
         ret = 1;
      }
   }

   return ret;
}

/**
 * Callback-function returning 24-bit color from the palette.
 * In this example we generate 1-bit picture, so, our palette is going to have just 2 colors.
 * Let the color 0 is a background color (let it be lightgreen),
 *     and color 1 is a foreground color (let it be darkgreen).
 *
 * @param user_data
 *    This is an arbitrary user data, the bmp_writer doesn't use it in any way.
 * @param color_idx
 *    Index of color in the palette to return.
 *
 * Pay attention at the macro BMP_WR__COL_RGB_32bit(r, g, b) - it converts three 8-bit color
 * components (R, G, B) to the resulting 32-bit variable of type T_BmpWr_Color32, which is
 * eventually returned.
 *
 */
static T_BmpWr_Color32 _bmp_palette_color_get_1bit(uintptr_t user_data, T_BmpWr_ColorIdx color_idx)
{
   if (color_idx == 0){
      //-- background color
      return BMP_WR__COL_RGB_32bit(0x74, 0xff, 0x51);
   } else {
      //-- foreground color
      return BMP_WR__COL_RGB_32bit(0x06, 0x30, 0x08);
   }
}

/**
 * Callback-funtion returning color number of the particular pixel on the screen.
 * Here, we return 0 (i.e. background color) if pixel is off, and 1 otherwise. That's easy.
 */
static T_BmpWr_ColorIdx _bmp_pix_color_idx_get_1bit(uintptr_t user_data, T_BmpWr_Coord x, T_BmpWr_Coord y)
{
   return _is_pixel_on(x, y);
}


int main(void)
{

   //-- Create structure with parameters for bmp writer
   T_BmpWriter_CtorParams writer_ctor_params = {

      //-- Main image parameters: color depth, size
      .color_depth = BMP_WR_COL_DEPTH__1,
      .width       = _IMG_WIDTH,
      .height      = _IMG_HEIGHT,

      //-- User's callback functions
      .callback = {
         .user_data = 0,   //-- Arbitrary user data. Not used in this example.

         //-- I already mentioned that there are three ways of configuration, for each of them the set of callback
         //   functions is different. So, these sets are grouped as union elements, their names are:
         //       bpp_1_4_8 : for 1, 4, 8 bits per pixel;
         //       bpp_16    : for 16 bits per pixel;
         //       bpp_24_32 : for 24, 32 bits per pixel.
         //
         //   Now we have 1 bpp, so, use first group:
         .func = {
            .bpp_1_4_8 = {
               .p_palette_color_get = _bmp_palette_color_get_1bit,
               .p_pix_color_idx_get = _bmp_pix_color_idx_get_1bit,
            },
         },
      },
   };

   //-- Create the T_BmpWriter object with needed params
   T_BmpWriter *p_bmp_writer = new_bmp_writer(&writer_ctor_params);

   //-- Now, byte-by-byte, get all the image data!

   while (bmp_writer__available_data_len__get(p_bmp_writer) > 0){
      char cur_char = bmp_writer__next_byte__get(p_bmp_writer);

      //-- now, cur_char contains the next byte of the image.
      //   we can whatever we want with it: probably collect it in the buffer to write to flash
      //   (and when buffer is full, write it to flash and then continue receiving data), maybe
      //   transmit it via UART (say, to PC), etc.
      //   This is completely up to you.
   }

   //-- Done. Delete the object now.
   delete_bmp_writer(p_bmp_writer);

   return 0;
}
Here is what we get: 
Generation of 4- and 8-bit picture
It is almost completely the same as 1-bit picture, but your functions are able to use 4 (8) colors instead of just 2 colors.
Generation of 16- picture
Color mask 5-5-5
Now we need just one callback instead of two callbacks, since we have no palette here:
/**
 * Callback-function returning color of the particular pixel on the screen
 *
 * Pay attention at the macro BMP_WR__COL_RGB_16bit_555(r, g, b). Don't mix up modes: 555 or 565,
 * otherwise things will obviously go wrong. All arguments of this macro are 8-bit, the macro
 * converts the color to the format 0rrrrrgggggbbbbb. Of course, if your color display
 * already stores data in this format, then you don't need the macro at all: just return
 * the value you got from display, and that's it.
 *
 * Here, we're going to make our diamond a bit red.
 */
static T_BmpWr_Color16 _bmp_pix_color_get_16bit_555(uintptr_t user_data, T_BmpWr_Coord x, T_BmpWr_Coord y)
{
   T_BmpWr_Color16 ret;

   char red;
   if (_is_pixel_on(x, y)){
      red = (S32)y * 0xff / _IMG_HEIGHT;
   } else {
      red = 0x06;
   }
   ret = BMP_WR__COL_RGB_16bit_555(red, (S32)x * 0xff / _IMG_WIDTH, (S32)y * 0xff / _IMG_HEIGHT);

   return ret;
}
And parameters structure:
   T_BmpWriter_CtorParams writer_ctor_params = {
      .color_depth = BMP_WR_COL_DEPTH__16,
      .width       = _IMG_WIDTH,
      .height      = _IMG_HEIGHT,

      //-- For 16-bit images we also need to specify which color mask we want to use.
      .opts = {
         .mask_mode_16bit = BMP_WR__MASK_MODE_16BIT__5_5_5,
      },
      .callback = {
         .user_data = 0,

         //-- here, specify our callback function
         .func = {
            .bpp_16 = {
               .p_pix_color_get = _bmp_pix_color_get_16bit_555,
            },
         },
      },
   };
And here is what we get: 
Color mask 5-6-5
Almost everything is the same as with 5-5-5, but we should use the macro BMP_WR__COL_RGB_16bit_565 and specify mode BMP_WR__MASK_MODE_16BIT__5_6_5.
Generation of 24-bit image
It's similar to previous example, but callback function returns 32-bit value:
/**
 * Callback-function returning color of the particular pixel on the screen
 */
static T_BmpWr_Color32 _bmp_pix_color_get_24_32bit(uintptr_t user_data, T_BmpWr_Coord x, T_BmpWr_Coord y)
{
   T_BmpWr_Color32 ret;

   char red;
   if (_is_pixel_on(x, y)){
      red = (S32)y * 0xff / _IMG_HEIGHT;
   } else {
      red = 0x06;
   }
   ret = BMP_WR__COL_RGB_32bit(red, (S32)x * 0xff / _IMG_WIDTH, (S32)y * 0xff / _IMG_HEIGHT);

   return ret;
}
Params:
   T_BmpWriter_CtorParams writer_ctor_params = {
      .color_depth = BMP_WR_COL_DEPTH__24,
      .width       = _IMG_WIDTH,
      .height      = _IMG_HEIGHT,
      .callback = {
         .user_data = 0,

         .func = {
            .bpp_24_32 = {
               .p_pix_color_get = _bmp_pix_color_get_24_32bit,
            },
         },
      },
   };
Here is the result: 
Generation of 32-bit image
Well, actually it makes little sense, because fourth byte isn't used, so the image size will increase uselessly. But if you want you can specify color depth BMP_WR_COL_DEPTH__32 anyway.
Allocation not from heap, but in stack or statically
As you've seen, we work with object like this:
   //-- Create the object T_BmpWriter
   T_BmpWriter *p_bmp_writer = new_bmp_writer(&writer_ctor_params);

   //-- .... use this object for image generation ....

   //   Delete the object
   delete_bmp_writer(p_bmp_writer);
Functions for creation and deletion of the object are called this way to be similar to analogous actions in C++: new_bmp_writer() allocates the object from heap and calls constructor for it, delete_bmp_writer() calls destructor and frees memory.
If you don't want to use heap, you can allocate the structure T_BmpWriter in whatever way you want, and then call constructor and destructor manually.
So, stack allocation will look as follows:
   //-- Allocate T_BmpWriter structure and call constructor
   T_BmpWriter bmp_writer;
   bmp_writer__ctor(&bmp_writer, &writer_ctor_params);

   //-- .... use this object for image generation ....

   //   Don't forget to call destructor
   bmp_writer__dtor(&bmp_writer);
Here we go.
Include to your project
- Download source code (project is hosted at bitbucket) and put it to your project's dir
- Include the file
bmp_writer/bmp_writer.cin the project - Make configuration file, it is included in the module like this:
#include "lib_cfg/bmp_writer_cfg.h"; so, create directorylib_cfg(if not already) and copy default configuration filebmp_writer/bmp_writer_cfg_default.h→lib_cfg/bmp_writer_cfg.h - If you use non-standard
malloc()andfree()functions (or don't use them at all), specify them in configuration file. If so, don't forget to add your own#includethere. If you don't usemalloc(), just comment them out.
Discussion
Great software! Used it to capture LCD images from a 128×64 Mono LCD and save to SD-Card for documentation